Web-Controlled LED Animations with Raspberry Pi and Arduino
Set up your Arduino and Raspberry Pi to control lighting and animation on an RGB LED strip from your smartphone or PC.
Things used in this project
Story
Project Overview
Arduino Light Animation (ALA) is an Arduino library for controlling LEDs and running colorful animations with the minimum amount of effort. The library provides more than 30 predefined animations and several color palettes. For more information about ALA library you can visit my blog.
This project introduces a Raspberry Pi 3 board that will provide a web page that allows to control the animations, colors and speed from a smartphone or a PC using the web browser. Here is a short video of AlaWeb in action.
There are few components necessary for this project.
- WS8212 RGB LED strip: This strips contains several RGB LEDs that can be individually addressed using a one-wire interface, allowing you full control over the color of each RGB LED.
- Arduino: The famous microcontroller board will run my ALA library to drive the LED strip receiving the commands from the Raspberry PI over the USB serial port. You can use Arduino Uno, Nano and Mega board.
- Raspberry PI: This small PC will provide the web page to control parameters of lighting and animation.
The project is quite simple if you are familiar with Arduino and Rapberry PI boards. I have split the project in two steps for guide you through the setup process.
Wiring
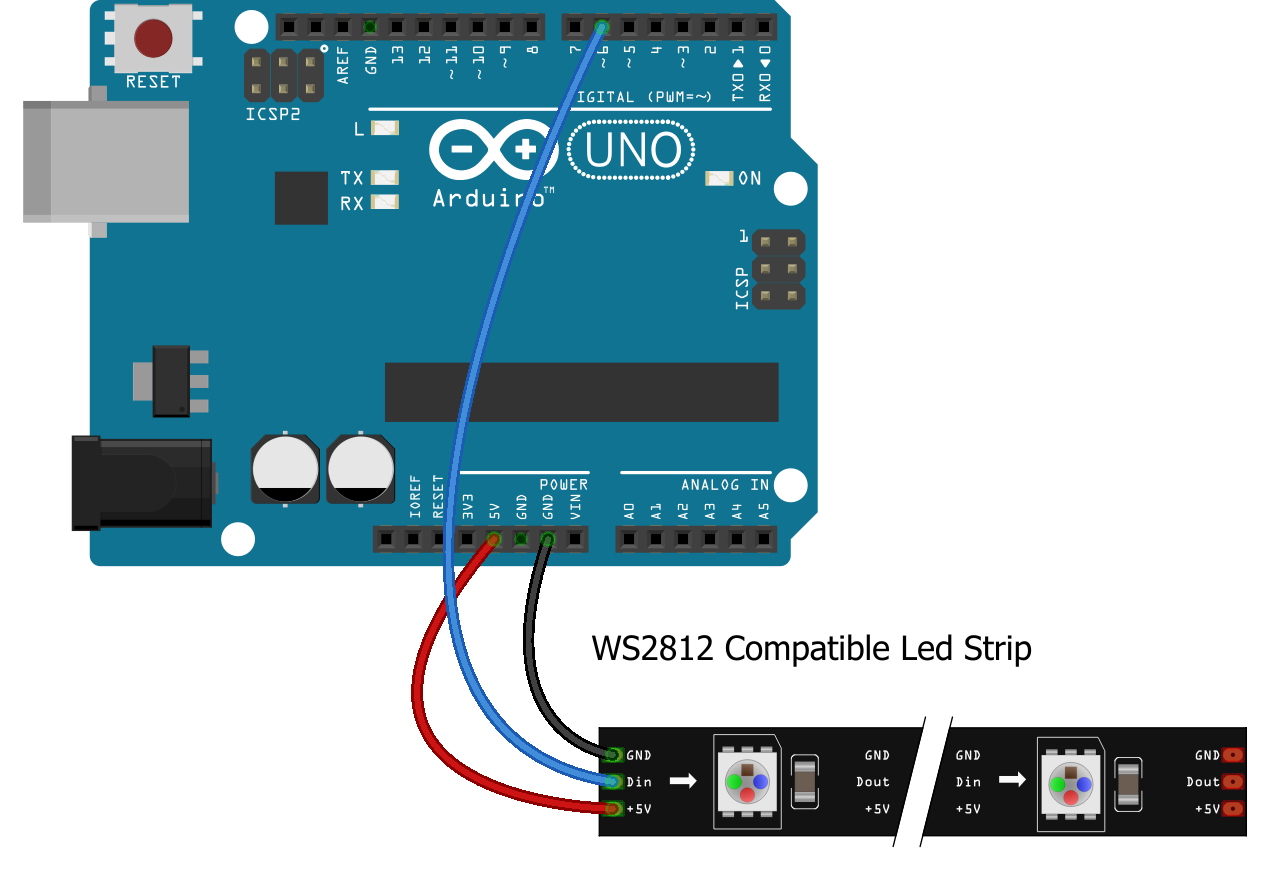
WS8213 LED strips are very easy to connect. You just need enough power to drive all these LEDs. For very short strips (no more that 10 LEDs) you can even power them directly from your USB port but for longer strips you have to provide a good power source. As a starting point I suggest to use the Arduino 5V pin to power the led strip as you can see in the video above.
- Arduino GND pin to WS2812 GND
- Arduino 5V pin to WS2812 5V
- Arduino pin 6 to WS2812 Ctrl/Din pin

Simplified connection scheme
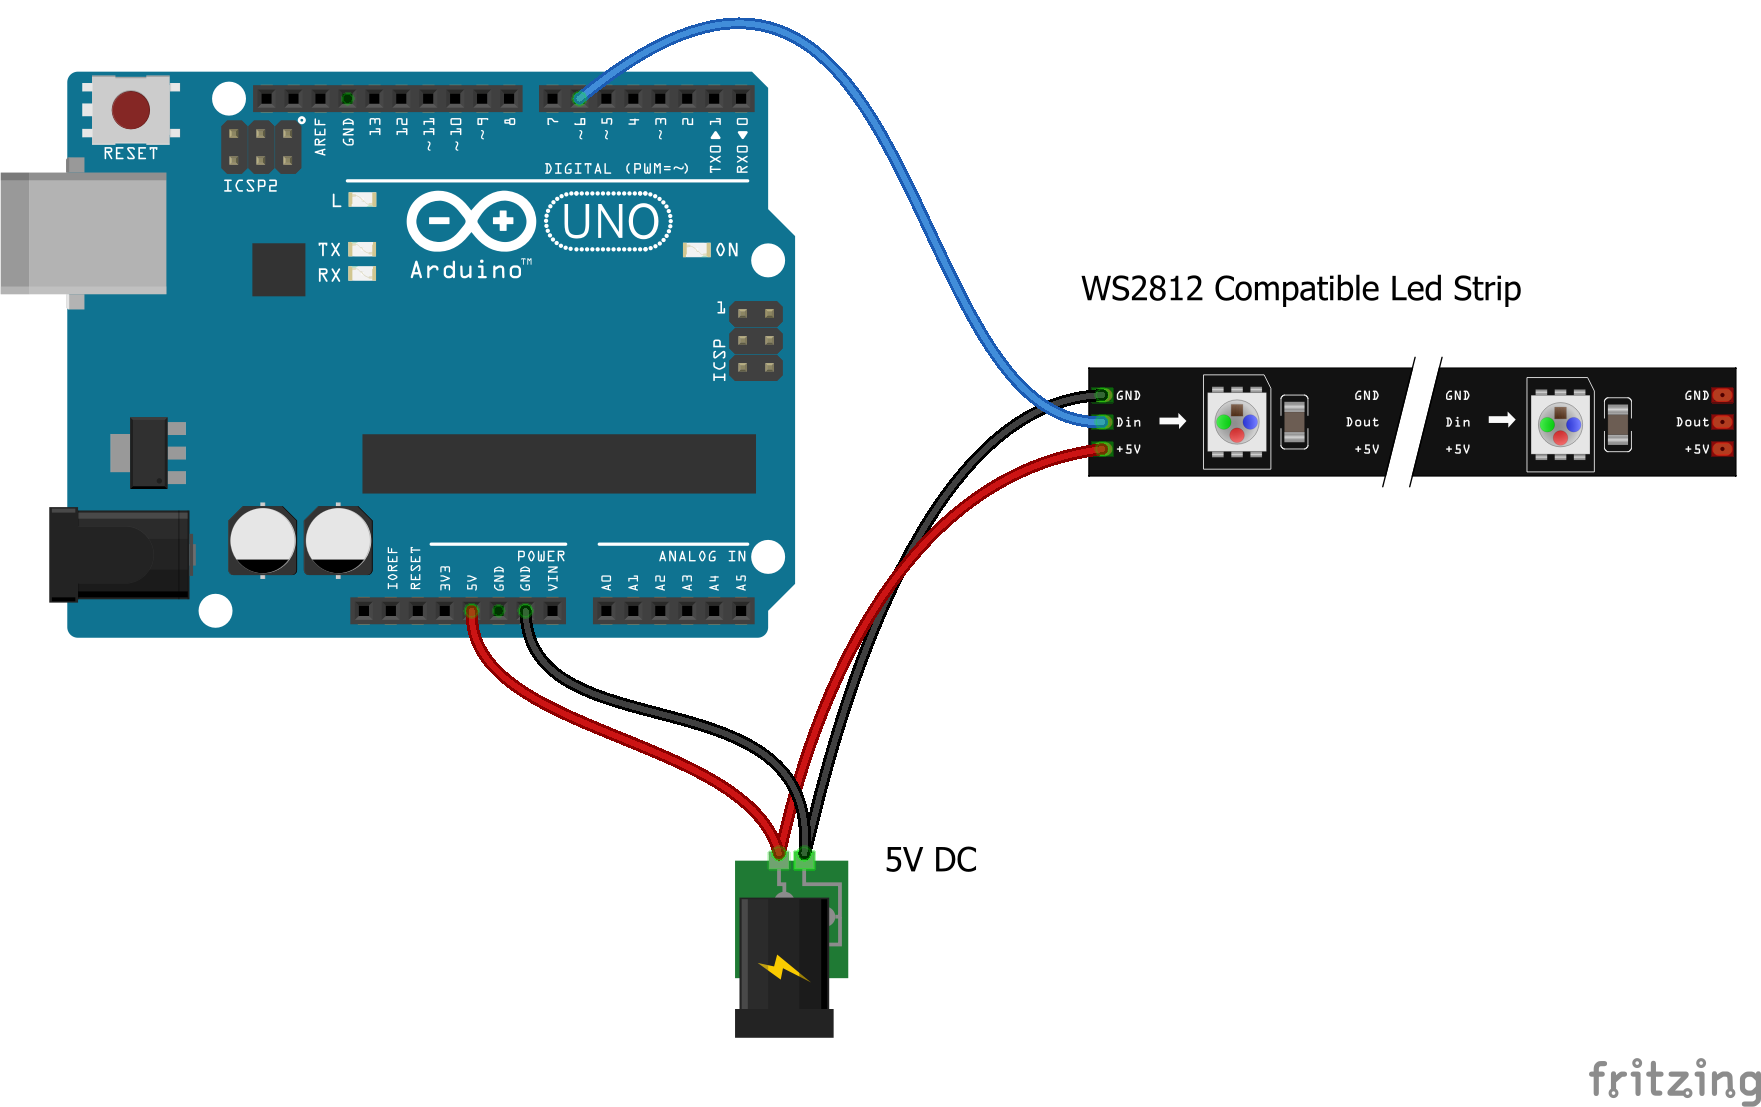
If you want to drive more pixels you must provide more power. The calculation is easy. Each RGB LED draws 60mA at full bright white. For example, to drive a 2 m long strip with 60 LED/meter you will need a 5V power supply providing 2m * 60pixel/m * 60mA = 7,2 A.
Connect your power supply, the Arduino board and the WS8212 strip like this.
- Power GND to Arduino GND and WS2812 GND
- Power 5V to Arduino 5V pin and WS2812 5V
- Arduino pin 6 to WS2812 CTRL pin

Advanced wiring for driving long strips
Note that powering the Arduino 5V pin you are providing power to Arduino so you don't need to connect it to a second power source on the barrel connector. Be very careful when using this connection scheme because the 5V pin bypasses the voltage regulator and protections. For further details you can read this guide.
Arduino Setup
Connect your Arduino board to the USB port of your PC. Open the Arduino IDE and launch the Library Manager (Sketch > Include Library > Manage Libraries) to install the latest ALA library.
Open the RgbStripSerial example (Files > Examples > ALA > RgbStripSerial) and verify that the NUM_PIXELS constant definition matches the number of leds in your RGB strip. Remember that if you want to drive more than 10 pixels you must use the improved connection scheme.
You can now upload the sketch to your board by pressing Ctrl+U from the Arduino IDE or selecting the Upload action in the Sketch menu. If you have problems uploading the sketch, check the board type and port in the Tools menu.
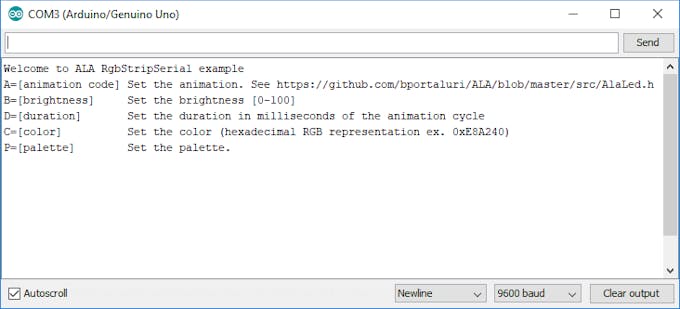
Open the Arduino Serial Monitor (Tools > Serial Monitor) and you will see a welcome message like this.

ALA commands in the Arduino Serial Monitor
Set the ‘Newline’ line ending in the bottom-right and ensure baud rate is set to 9600.
Now try the following commands (in bold) with no spaces:
- A=101 - turn on the leds
- A=251 - run a ‘larson scanner’ animation
- P=2 - sets a rainbow palette
- A=242 - another animation
That's cool right?
You can experiment the different commands and combinations following this short reference:
- A=[animation code] - Set the animation. Available animation codes are listed in the AlaLed.h header file.
- B=[brightness] - Set the brightness. It must be in the [0-100] range.
- D=[duration] - Set the duration in milliseconds of the animation cycle. Standard values are between 500 and 5000.
- C=[color] - Set the color. It must be an hexadecimal RGB representation like E8A240.
- P=[palette] - Set the palette. It must be in the [0-5] range.
Now lets control the animations from your smartphone.
Raspberry PI setup
In this part of the project we will setup the Rapberry Pi board to run a small web server to control the LED strip from a web browser. Note that the same application can run on any PC with Python 3 installed.
Prerequisite is that your Raspberry PI is already configured and running the latest Raspbian OS (I have tested it with Stretch) and connected to the internet.
We first need to install few libraries for Python 3 with the following command:
sudo pip3 install pyserial flask
Create a home directory for your project:
mkdir /home/pi/AlaWeb
cd /home/pi/AlaWeb
Download AlaWeb git repository into the LightStrip directory and extract it.
wget https://github.com/bportaluri/AlaWeb/archive/master.zip
unzip master.zip
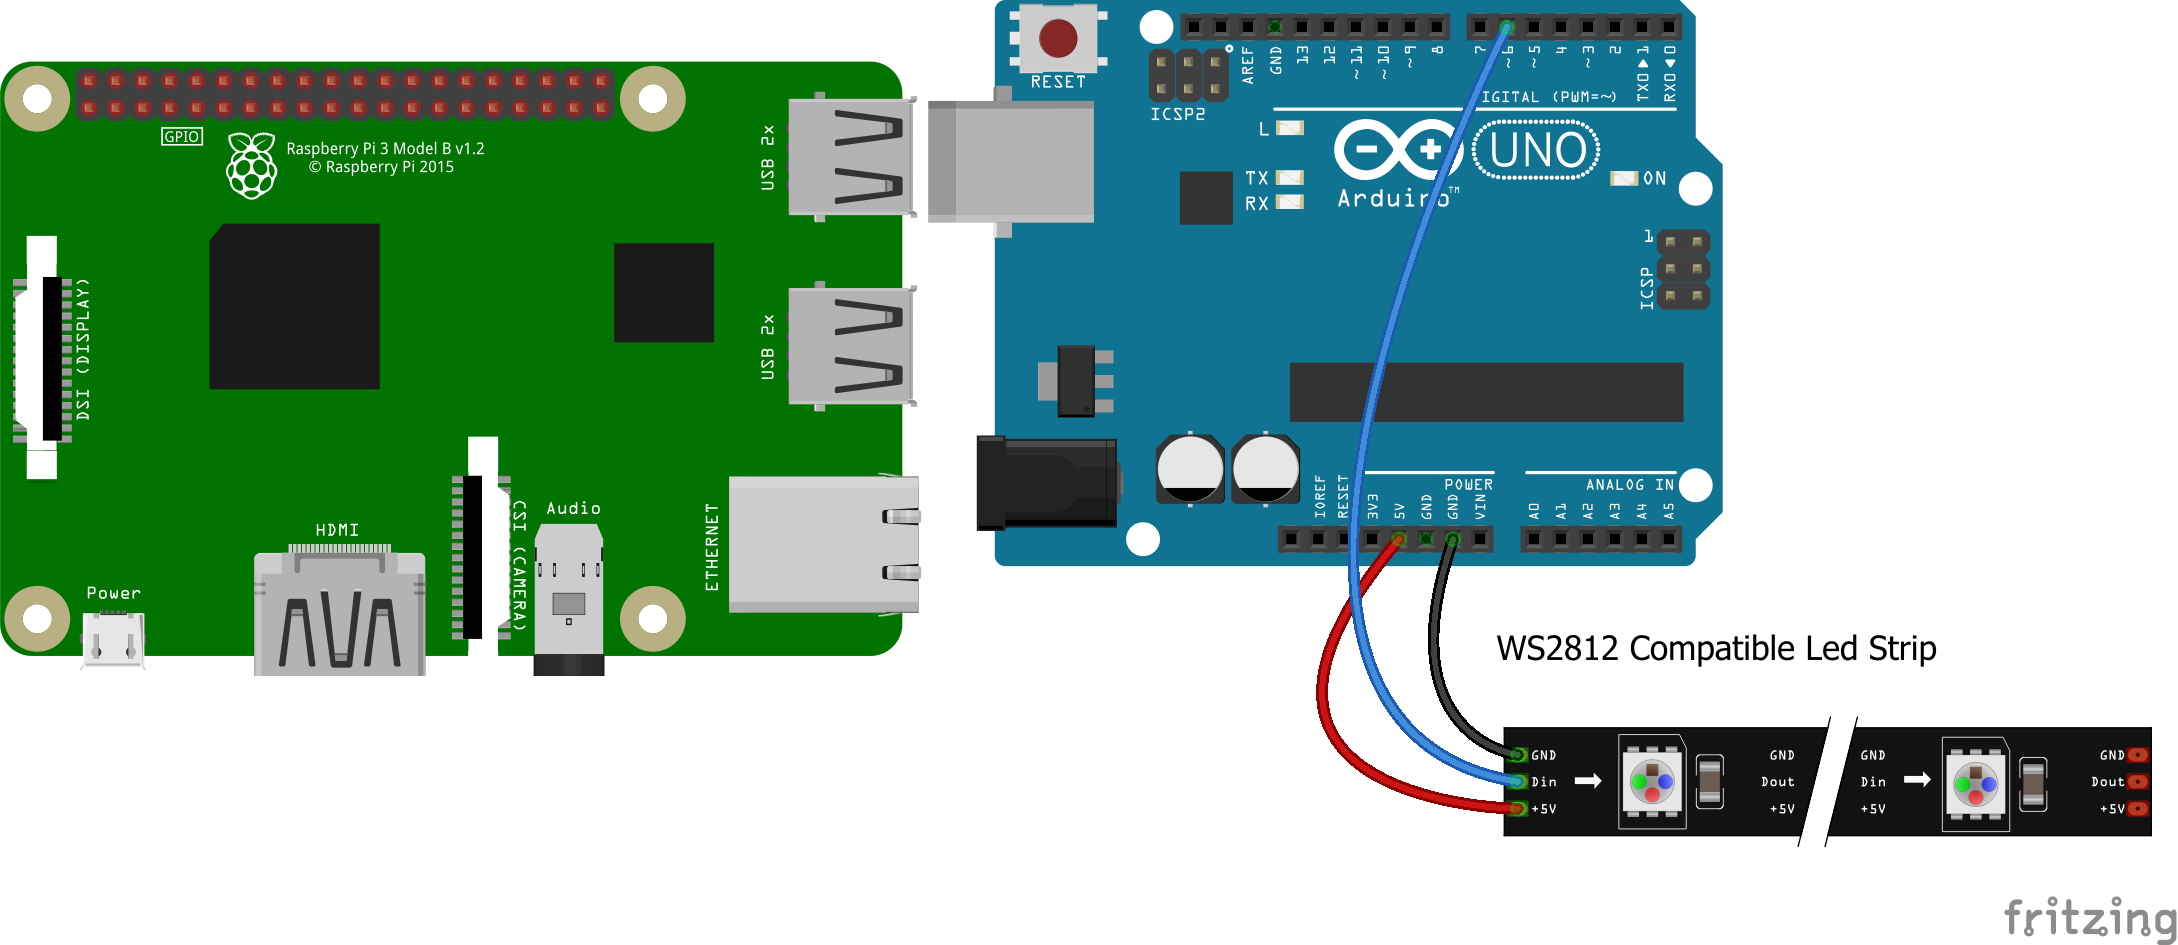
All the software is now ready and set up. Connect the Arduino USB port to the Raspberry PI. The AlaWeb application you have just downloaded will communicate with the Arduino board through the USB serial connection.
cd AlaWeb-master
sudo python3 AlaWeb.py
The AlaWeb application will list all the USB serial ports and try to detect Arduino automatically. If it keeps looping, break the execution and try passing the port name as follows (replacing the port id as needed):
sudo python3 AlaWeb.py /dev/ttyACM0
If everything is ok you should see something like this.

Open a web browser and connect to the URL displayed. You will get a web page full of buttons allowing to control the LED strip from a web browser.
Enjoy!

AlaWeb home page


ไม่มีความคิดเห็น:
แสดงความคิดเห็น